OS
소프트웨어 로드발란스 haproxy
- 비아웹 오래 전 2024.07.01 15:06 인기
-
 279
279
 0
0
안녕하세요
호스팅 전문기업 비아웹입니다.
소프트웨어 로드발란스 기능을 제공하는 haproxy 를 이용하여 웹서버 로드 발란스 테스트 내용 공유합니다.
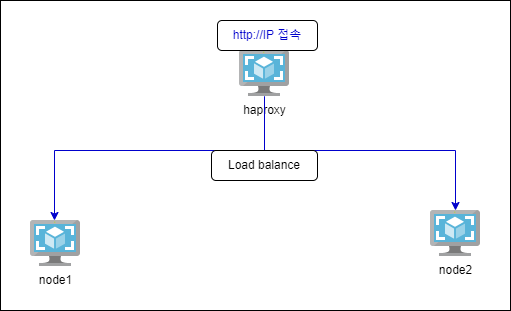
1.서비스 구성도
2. 테스트 서버 구성 (OS : CentOS 7.9)
| 서버 | IP | 역할 |
| haproxy | 192.168.20.18 | haproxy 서버 |
| node1 | 192.168.20.19 | 웹서버 1 |
| node2 | 192.168.20.20 | 웹서버 2 |
3. node1/ node2 apache 설치 및 구성
yum install httpd
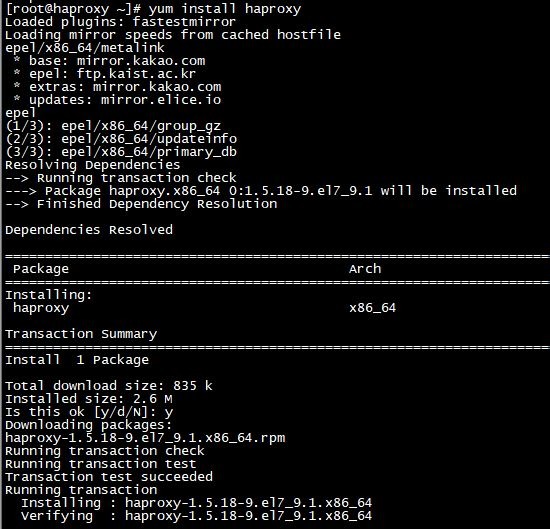
4. haproxy 서버 haproxy 설치
yum install epel-release
yum install haproxy
5. haproxy 설정
cd /etc/haproxy/
mv haproxy.cfg haproxy.cfg_orig
vi haproxy.cfg
# Global settings
#---------------------------------------------------------------------
global
log 127.0.0.1 local2
chroot /var/lib/haproxy
pidfile /var/run/haproxy.pid
maxconn 4000
user haproxy
group haproxy
daemon
# turn on stats unix socket
stats socket /var/lib/haproxy/stats
defaults
mode http
log global
option httplog
option dontlognull
option http-server-close
option forwardfor except 127.0.0.0/8
option redispatch
retries 3
timeout http-request 10s
timeout queue 1m
timeout connect 10s
timeout client 1m
timeout server 1m
timeout http-keep-alive 10s
timeout check 10s
maxconn 3000
frontend main *:80
default_backend http
backend http
balance roundrobin
server app1 192.168.20.19:80 check
server app2 192.168.20.20:80 check
6. haproxy 실행 및 상태 확인
systemctl start haproxy
systemctl status haproxy

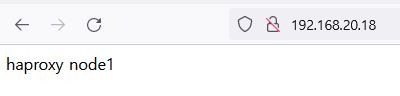
7. 웹접속 테스트
- roundrobin 설정으로 접속시 서버 변경 확인

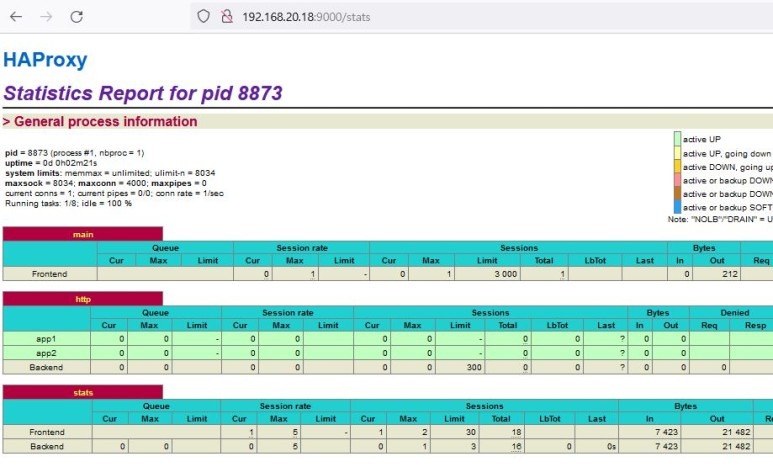
8. haproxy status
- haproxy.cfg 설정 파일 내용 추가
#haproxy status
listen stats
bind *:9000
mode http
stats enable
stats hide-version
stats uri /stats
maxconn 30
stats refresh 30s
- stats 확인
9. haproxy balance 옵션
10. node 서버 로그에 실제 client IP 설정 (xforwardfor)
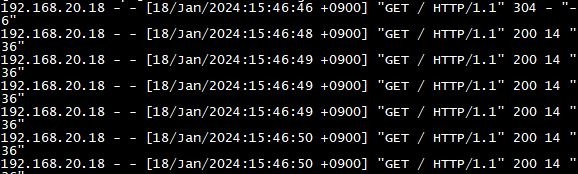
- 설정전 로그 (client IP가 haproxy 서버 IP로 기록)
- haproxy 설정 (option forwardfor 추가)
frontend main *:80
default_backend http
option forwardfor
- apache 설정 수정 (httpd.conf )
#LogFormat "%h %l %u %t \"%r\" %>s %b \"%{Referer}i\" \"%{User-Agent}i\"" combined # 제거
LogFormat "%{X-Forwarded-For}i %l %u %t \"%r\" %>s %b \"%{Referer}i\" \"%{User-Agent}i\"" combined# 추가
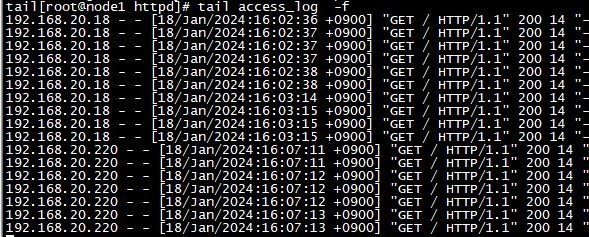
- haproxy 와 apache restart 후 로그 확인
이상과 같이 haproxy 를 이용하여 간략한 LB 구성을 진행하였습니다.
테스트는 http 를 이용하였으나, https 및 mysql 등 실제 로드발란스에서 설정 가능한 모든 서비스 설정 가능합니다.
실제 서비스에서는 서비스 안정성을 위해 haproxy 서버를 이중화하여 진행합니다.
물론 추가적으로 keepalived 설정 등이 필요합니다.
고속 / 대량의 서비스 환경에서는 haproxy 를 multi process / multi thread 구성으로 진행하니 사용 용도에 맞게 서비스 구성이 필요합니다.
감사합니다.
서버호스팅 전문기업 비아웹
- 이전글오픈소스 디스크 이중화 DRBD2024.07.01
- 다음글ubuntu 20.04 Gui 환경 접속 (windows 원격데스크탑 이용)2024.06.28
댓글목록
등록된 댓글이 없습니다.